September 25, 2014

Coweta Artisan Giveaway Feature: Snow&Company

Happy Thursday! It's my pleasure to introduce you to Amanda of Snow&Company. She's a talented graphic designer hailing from Newnan. Though relatively new to the Etsy world, she's already marking her mark with whimsical prints and beautifully placed quotes. Amanda was kind enough to contribute one of her adorable art prints to the giveaway. Take it away, Amanda!


Hi there! My name is Amanda Snow of Snow&Company, and I am a graphic designer working from my home studio in Newnan, Georgia. I am inspired by just about everything feminine! That doesn't always mean flowers and pink (although I love them both). I love a good quote, perfectly paired with colors and design! 

People often ask me, "What do you do with a print?" That questions always baffles me. You can put it in a frame and hang it up or put it in a frame and place it on your desk, table, side table, vanity, countertop, (insert table-like surface here). I love to have a print taped to my refrigerator, and I absolutely love my washi wall. All things (prints, quotes, pictures, fonts) that inspire me, hung on a wall with washi tape. My theory is that we change every day, our homes are living and breathing places that should change with us. If a print makes me happy, it's worth the purchase.


Surprisingly, most of my prints start with custom orders. Friends, family and thankfully now that I have become more established, strangers, give me quotes they would like to see in print form and I run with it! I have quite an eclectic style, so I run my prints through the filter: Would I put this in my house? If the answer is yes, I put it up for anyone to purchase from my shop!

I graduated from Auburn University in 2012 with a degree in Public Relations. Unfortunately, the job market wasn't at it's best, so I took to freelance writing for magazines. One of the magazines needed a full-time graphic designer, so I began my journey feet to the street. Youtube and Lynda.com were my best friends as I learned by doing. I fell head over heels in love with images and typography. Since then, I have added a few companies to my list and have become somewhat of a freelance graphic designer.


I started my Etsy shop on Aug. 1, 2014 after longing for an outlet that was lucrative and freeing. I love working as a graphic designer, however most of the time it is in the parameters of who I am working for (as it should be). Etsy gives me the freedom to make whatever I want and have the opportunity for anyone to enjoy my work! 

I live in the loveliest (and teeniest) little house in Newnan with my husband of almost a year, Matt, our cat, Skeeter and our black lab, Cam. It's a really happy life!

Thanks Amanda! You can stalk Amanda on social media via the links below:


a Rafflecopter giveaway

September 24, 2014

Coweta Artisan Giveaway Feature: Lemons & Cream

Happy Wednesday! It's my pleasure to introduce Rebekah of Lemons & Cream. She's a seasoned Etsy veteran hailing from Newnan, who has an eye for adorable fabric prints and a knack for knitting. Rebekah was kind enough to contribute one of her best-selling bow ties to the giveaway.  

Photo by Susan Crutchfield Photography
Hello! My name is Rebekah of Lemons & Cream, and I design and make children’s accessories and photography props. I work from my home studio in Newnan, Georgia.

The inspiration for my hand knit baby accessories comes from the world around me. I am drawn to simplicity with detail and texture, and I incorporate these elements into my designs. I have found inspiration in everything from classic films to a hot air balloon floating in the sky. My goal in making baby accessories is to provide depth and detail without overwhelming the natural delicacy of a child’s features.

Photo by Susan Crutchfield Photography
I am constantly jotting down new ideas on the backs of receipts and napkins. When inspiration strikes, I can’t rest until I have the idea down on paper. After I sketch out an idea, I work on it until it is just the way I want it. Sometimes, this means remaking the same item multiple times until it is perfect. The creative process is my favorite part of Lemons & Cream. I love the way it challenges me to find a way to make my visions a reality.

Photography by Susan Crutchfield Photography
My grandmother learned to knit during World War II when the women of her town began making knitted sweaters and scarves for the troops abroad. A few years ago, she passed this skill on to me. I found that I loved taking a skein of fiber and turning it into something soft and beautiful. As I became a more skillful knitter, I found I really enjoyed designing and hand knitting children’s accessories. At first, I just made them as gifts for friends. When people began requesting custom items, I decided to start an Etsy shop. Eventually, my product line grew to include baby ties and bow ties.


Every item I list in my shop is unique. I designed and wrote the patterns for each piece that is for sale. The fibers and fabrics that go into making my ties, bow ties and hand knit hats and blankets are carefully chosen for quality, color and pattern. Every part of the process is important to me to ensure that the end product is the highest quality version.

After I graduated from college, I fell into freelance writing. While I enjoyed this work, it didn’t offer the hands on creativity that I love. Lemons & Cream is the perfect balance of creativity and active involvement in my work.

Thanks Rebekah! You can stalk Rebekah via the social media links below!


Be sure to enter the giveaway for your chance to win!


a Rafflecopter giveaway

September 23, 2014

Coweta Artisan Giveaway Feature: Baubles by eLi

Happy Tuesday! Today, it's my pleasure to introduce Sharon of Baubles by eLi. Sharon is a crazy talented jewelry designer hailing from Sharpsburg who incorporates metals and concrete into her pieces.  Her attention to detail and use of different components makes her jewelry one of a kind. Sharon was gracious enough to contribute one of her braided leather bracelets to the giveaway. Take it away, Sharon!


Hi, my name is Sharon Kopko and I am the jewelry designer and owner of Baubles by eLi. I create from my cozy home studio, in my little corner of the world located in Sharpsburg, Georgia.

I have always had a creative soul since I can remember, but I have spent most of my career in the corporate world. The left side of my brain was in charge, but my artistic nature was always present. It was just buried under a few layers of logic, regulations and order.


I would dabble here and there in my spare time making beaded jewelry for my friends and family as gifts or just for fun. Spare time was a limited commodity until recently when I decided to let the right side of my brain take over. I now create jewelry on a full time basis and am a part time consultant.


My fascination with glass guided me to venture into my first formal lampworking class in 2004. The
indescribable magic that occurs when glass and fire meet is absolutely incredible. I purchased my first torch and there was no turning back. Baubles by eLi was born to showcase my tiny pieces of glass art. I created lots and lots of small glass beads adorned with intricate designs and began selling my goods on Etsy.

The artsy bug bit me once again in 2008 when I fell in love with metal and the many forms it can take. I came to realize that hammering, forging, soldering and so forth were very therapeutic activities for me. A few metalsmith courses later, lots of research and practice had taken me to another level of jewelry design. I am a bit A-D-D when it comes to creativity and jewelry design. It is very difficult for me to choose a “niche” because I LOVE so many different mediums. I guess you could say my brand is custom jewelry designed to make you feel pretty.


I now have three torches, two kilns and LOTS of tools! Did I mention my obsession with tools? I can’t get enough of them. My husband teases me about having more tools then he does! My Christmas and special occasion lists consist of sandpaper, drills and bits, files, collets, clay, metal and so on.

Family is everything to me! My very talented, engineer husband John, has supported my endeavors in so many ways. He built all of my benches, designed a vent system for my glass station and even shared many of his tools whilst I was building my own inventory of power tools. John made the table in my studio from a repurposed door, I love it!

I am also blessed with very inspiring children, Jaimi, Alex, Emma and Sarah. Each one contributes to my creativity on an on-going basis due to their ages and various interests. They share trends and jewelry that they would like to wear. Let’s not forget the four-legged family members: two girly-girl dogs Presley and Phoebe and Teddy, a very handsome Bull Mastif weighing in at 115lbs. I have made doggie jewelry for all of them too!

I am surrounded by inspiration every day. For the most part, my designs reflect a minimalist approach, inspired by the simple things in life. Our home is embraced by the beauty of nature with three sides of our lot surrounded by woods and a creek in the front. I lean towards a rustic style with a pop of color here and there depending on the medium I am designing with. Texture, music, geometry and inspirational words are also amongst the things that make my creative juices flow.


Baubles by eLi is one of many jewelry shops out there, but my goal is to create jewelry that puts a smile on your face and makes you feel pretty. A simple piece that might bring back a memory or that goes perfectly with a favorite outfit or that oversized sweatshirt and favorite jeans. Each of my handmade designs reflects a bit of my own personality depending on the mood that I am in. Some days I am in a technical mode creating with metal and torches or down-to-earth designing leather and silver pieces and on other days I am more playful experimenting with clay and color. Hopefully with my eclectic range of designs I will reach out to a large customer base. Custom designs are also a favorite of mine to do. There’s nothing better than creating a custom piece for someone that tells a story, cherishes a memory or celebrates a special occasion. Especially when they receive it and share their thanks and praises.

Thanks Sharon! You can stalk Sharon on the social media links below:


September 22, 2014

Coweta Artisan Giveaway


It's finally here! Today kicks off the Coweta Artisan Giveaway. This giveaway has been in the works for well over a month and I'm so excited to be hosting it.

One of the many things I love about Etsy is the sense of community that comes with it. I really wanted to connect with some local Etsy seller in my area and found three wonderful fellow shop owners. We teamed up and put together a pretty sweet giveaway. The total prize package is worth $80!

I'd like to thank these each of these ladies for being phenomenal to work with and I truly appreciate their participation in the giveaway. Over the next week, I will be featuring each one here on the blog so you can hear the amazing stories behind their shops. Until then, enter the giveaway, check out their respective Etsy shops, and the awesome items we're giving away:

a Rafflecopter giveaway

September 17, 2014

DIY Dryer Sheet Ghosts


The official first day of fall is next week which is my absolute favorite season. I love the cooler air, getting to wear boots and pull-overs, the smell of apple cinnamon wafting through the air and going fall festivals.

Quite frankly, the best months of the year end in -BER! Not to mention the best holidays are all in these months as well in my not so humble opinion.

I've already broken out my fall decor and have started to piece together some Halloween-themed decor projects.

This past weekend I was cruising around Pinterest {surprise, surprise} and stumbled upon these little guys.


Confession time: Christmas is my all-time favorite holiday. {Probably not a surprise to any who have to withstand the annoying Christmas countdown posts I regular share on my personal Facebook page throughout the year} That said, most of my decoration budget goes to it. I have storage totes upon storage totes filled to the brim with wreaths, ornaments, tree trimmings, stocking holders, etc. 

For all the other seasons/holidays, I have one measly box each. I've been trying to slowly fill these boxes with post-holiday sales and crafty projects. When I come across a little craft project I can do with what I've got laying around the house, I'm all over it. 

In the picture I found, the hanging ghosts are made out of cheesecloth. Until I actually read through the tutorial, I thought they were dryer sheets. I didn't see a reason why they wouldn't work just as well {and they did!}. After all, I didn't have any cheesecloth on hand, but I had plenty of used dryer sheets that were willing to be recycled. 

What You'll Need
Used dryer sheets (found they work better than new ones)
Golf ball or ping pong ball
Hairspray
Fishing Line
Scissors
Glue
Felt, Pipe Cleaner (something for the eyes)

Step One. Wrap your dryer sheet around your golf ball, twist the ends around the ball and spray generously with hairspray. Keep the twisted end pinched until your hairspray dries and gently remove the dryer sheet off of the golf ball. You should have a ghosty-looking formation now. 


Step Two. Cut some eyes for your little ghosty friend. Using your fingers to hold the ghost formation, glue the eyes onto Mr. Ghosty's head. Let the glue dry.


Step Three. Cut some of your fishing line and gently thread it through Ghosty's head. Carefully, tie it off.

Step Four. Tie them onto your chandelier or chosen hanging surface. My light happens to have hooks that the glass panes hang on. I just tied a loop on the other end of my fishing line and hung them on the glass pane hooks.


There you have. Super simple and completely free. Love it!


These dryer sheet ghosts will now have a happy home on my dining area chandelier. 

Happy creating!
Miranda


September 15, 2014

Happily Ever Tees

I've been a follower and avid fan of Nicole from Designs by Nicolina for about a year now. Besides being a fellow designer, I love her whimsical style. Not to mention, she shares a love for Disney just like me. And, she lives in Georgia. Seriously though, I draw a lot of encouragement and inspiration from her. 

When she announced her latest venture in partnering up with Katy from Handmade Escapades to sell Disney-inspired tees, I knew I had to have one for our upcoming trip to Disney World. There was only one little problem - the Happily Ever Tees shop would be opening September 1st. We were leaving for our trip September 4th. They make each tee custom made to order so it takes 1-2 weeks to receive your shirt. Clearly, I didn't have that kind of time. 

Here is where I have to sing praises for both Nicole and Katy. They went above and beyond to rush my tee to ensure I had it in time for our trip. I actually placed my order before the shop was even technically open. I take a little pride in the fact I was their first sale. 


I've long loved Nicole's "To Infinity and Beyond" art print in her shop. When I saw a sneak peek that they'd be offer the design on a tee, it sealed the deal. 

The shirts are great quality too. I've washed mine a couple times already. It hasn't shrunk or faded and the design is still flawless. Perfection.

Of course, I have some others on my wish list.


Without a doubt, Nicole and Katy went to infinity and beyond to ensure I received my tee before our trip. It's a good reminder of why buying handmade and supporting small business is the best. 

Have a Disney day!
Miranda


September 11, 2014

Tips for Getting the Most Out of Your FastPass+


We had a blast celebrating our two year anniversary at Disney World last week. It seems that I may have had a little too much fun, because I came home sick as a dog! I'm actually writing this post laid up in the bed with my puppy dogs, a fresh cup of hot tea and some trusty cold medicine. However, I can assure you it was {without a doubt} so worth it!

While it was fresh on my mind, I thought I'd share some tips about the FastPass+ we learned while on our trip. This was our first time at Disney using the FastPass+ and the MagicBands. {For more information on MagicBands, you can read here. For more information on FastPass+, you can read here.}

We were very pleased with the FastPass+, but had the same common complaint I've seen from pretty much everyone. You only get three advanced FastPass+ reservations per day. Quite frankly, three just isn't enough! Especially during their slow season which is when we went.

We purposely picked the weekend after Labor Day to go to Disney World. We knew it was their slow season which means shorter lines and discounted rates. Most rides we just walked up to and got straight on. However, I was very strategic in booking our FastPasses even with the shorter lines. This tip applies even more in the peak seasons!

Strategize before booking your FastPass+. Some rides have longer waits than others because they are newer {like the Seven Dwarfs Mine Train} or very popular {Peter Pan's Flight}. Slow season or not, these will have a 20 minute or more wait. You only have three per day so you had better make them count!

Here's my list of recommended Magic Kingdom FastPass+ worthy rides:

  • Pirates of the Caribbean
  • Splash Mountain
  • Big Thunder Mountain Railroad
  • Haunted Mansion
  • Peter Pan's Flight
  • Enchanted Tales with Belle
  • Seven Dwarf's Mine Train
  • Space Mountain


Book your FastPass+ as soon as you are able. You can book FastPass+ 60 days in advance if staying on property. Mark it on your calendar and know which selections you'll be making. Some go very fast - like FastPasses for meeting certain Disney Princesses which brings me to my next tip. 

Save a FastPass+ for any Disney Princess you'd like to meet!
Especially if it's Anna or Elsa! I cannot stress that enough. Both days we were in the Magic Kingdom, the wait for Elsa and Anna was 45 minutes minimum. Most of time, it was an hour or more. During the peak season, we heard from another family that they waited five hours to see Elsa and Anna! Holy COW!


Use your additional in-park FastPass+ after you've used all your reserved ones. While we were there, we learned that after you used all your reserved FastPasses for the day, you could book one more additional FastPass+ at one of the kiosks in the park. The additional FastPass+ is rolling which means each time you use an additional FastPass+, you can select a new one. 

Disney really didn't advertise this fact too much. In fact, we figured it out on a fluke and confirmed it with a Cast Member. 

The moral of the story? Book your cannot-miss-rides with your three advance FastPass+ reservations and utilize the kiosks at the park for the rest. 

Book your FastPass+ for after lunch. If you arrive at the park in the morning, there is not as many people yet. The parks really fill up after lunch and that's when the lines will grow. Thus, after lunch is the best time to put those FastPasses to work.  Remember, you're making them count!

Have a Disney day!
Miranda


September 3, 2014

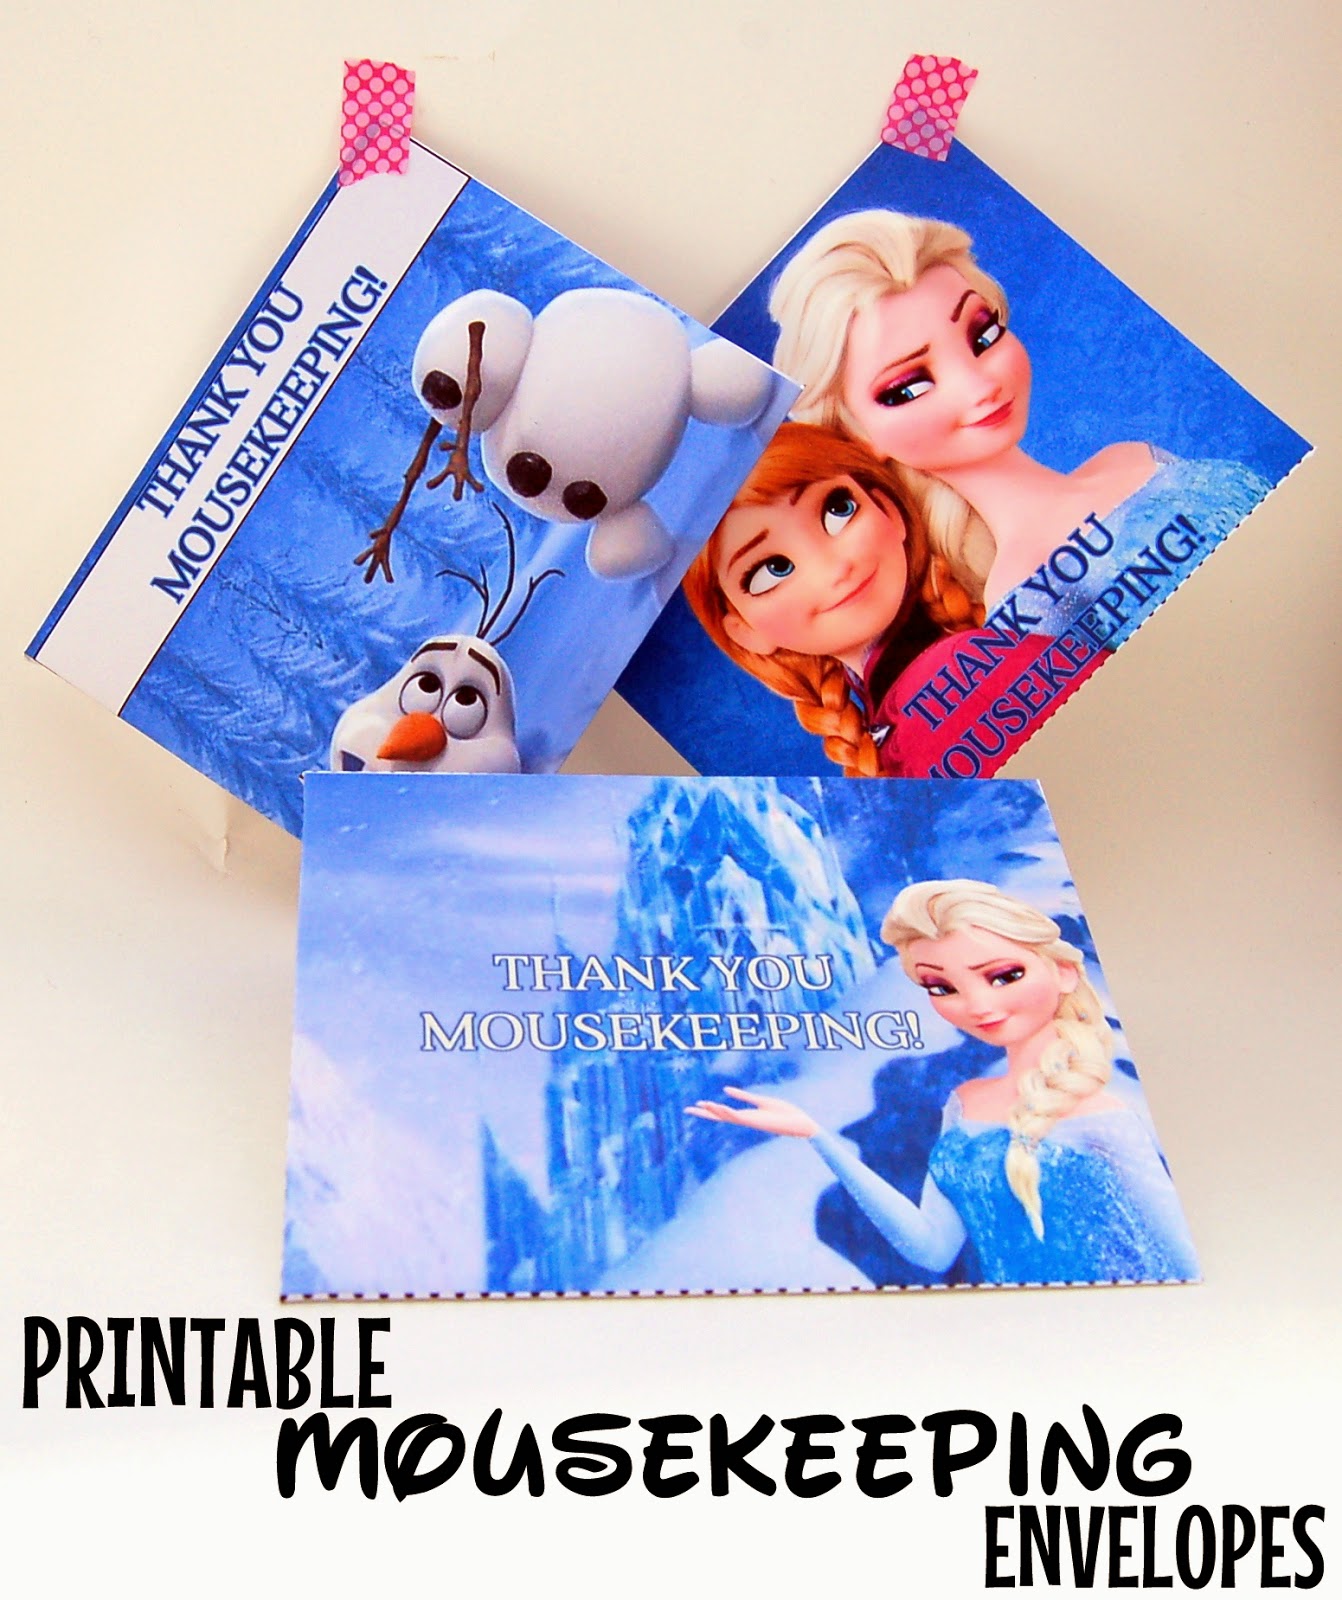
FREE Printable Frozen Mousekeeping Envelopes


Is this real life? We're leaving for Disney World tomorrow morning to celebrate our two year anniversary!

The magic of Disney World isn't only in the parks. If you are staying on property, Mousekeeping (Disney's version of housekeeping) makes sure to add a little extra magic that awaits you upon return to your room.

We last visited Disney World for our honeymoon. After the parks closed, we looked forward to what surprises were in our room. This time around I wanted to properly thank Mousekeeping for the extra magic they add to our stay with some special envelopes to put their tip in.

The rule of thumb is $1 per person in your party + $1 per day. For example, we {a party of two} will leave $3 each day of our stay.

Why will we leave an envelope for each day of our stay? Because the staff rotates out! If I waited until the end of our stay to leave one large tip, those that attended to our room for the first days would miss out.

Of course, my Mousekeeping envelopes are Frozen theme! I may or may not have booked a FastPass time to meet Anna and Elsa...


Each envelope is available FREE for download below. Just click on the picture or the link below to get yours!

To assemble, you'll need a pair of scissors and a little glue. Simply cut along the solid black lines, fold along the dotted lines and then glue the two sides.


Have a Disney day!
Miranda
Related Posts Plugin for WordPress, Blogger...
Powered by Blogger.
Designed By Boutique-Website-Design