December 23, 2013

The Christmas Home Tour 2013

Merry Christmas!

Tomorrow is Christmas Eve and I thought I'd give a little tour of our home all decorated. Seeing as this is our first Christmas in our first home, I thoroughly enjoyed decorating the house for the holidays.

When we first pulled our Christmas decor up from the basement, my husband said I had more than enough to decorate with. Once I had it all out and up though, he changed his tune saying, "I guess this house is a lot bigger than our apartment was." That said, I had all the excuse I needed to purchase some new staple decor items. Oh, how terrible, right?

I hope you enjoy the tour and happy holidays!
Miranda


December 19, 2013

Foodies & Crafties Soirée - Blog Hop & Link Party #7


Welcome to Foodies & Crafties Soirée - Blog Hop & Link Party #7
each Thursday at 6PM EDT
#foodiescraftiessoiree
Wishing you & your families a wonderful Christmas Holidays!
This will be our last party this year, hope to see you all next year!

About the Party

Each Thursday, there will be a blog hop and a link party going live at 6PM EDT. Each week you will have an opportunity to link your different social media, for example:
  • week1: pinterest | week2: google+ | week3: facebook, etc.
Once all the social media are done, we will start over. There will be one featured blogger selected each week from the blog hop and a few projects/recipes from the link party. You will have a great chance to meet new friends, gain more exposure for your blog and more new followers!

The party is hosted for you by:

Gosia from Kiddie Foodies (host)
Gosia Kiddie FoodiesGosia loves sailing, travelling, gardening, sewing and all kinds of DIY, creative things. On her blog, she shares simple, healthy recipes for kids presented in a funny way to encourage them to discover veggies and fruits in a pleasant and tasteful way. Even picky eaters will love it! You can also find there different activities for kids, crafts and free printable coloring pages.
Follow her on: Pinterest | Google+ (Gosia) | Google+ (Kiddie Foodies) | Facebook | Twitter | Bloglovin | Instagram
Kallee from Creative Southern Home (co-host)
Kallee CreativeSouthernHome Kallee lives in East Tennessee with her husband and 4 great kids. She loves to read, play the piano, cook, craft and create. On her blog she enjoys sharing recipes she has tried, household tips, decorating, DIY, fun things to do with the kids, and the always fun reviews and giveaways.
Follow her on: Pinterest | Google+ | Facebook | Twitter | Bloglovin | Instagram
Miranda from Mr. and Mrs. Winslett (co-host)
Miranda  Mr. and Mrs. Winslett Miranda is a stationary designer who creates and sells her own line of stationary goods at PaperLark Studio. Outside of her design studio, Miranda is an avid crafter and scrapbooker who shares her latest projects at Mr. and Mrs. Winsletta. She's married to her high school sweetheart and lives with two of the most spoiled fur babies on earth.
Follow her on: Pinterest | Google+ | Facebook | Twitter | Bloglovin | Instagram

Features from last week's Foodies and Crafties Soirée #6

The featured Blogger from last week's Instagram Blog Hop is Carrie from Curly Crafty Mom from . Congratulations Carrie!!! We did a random draw, so everyone had the same chances. Please show Carrie some love and follow her on Instagram!Foodies and Crafties Soiree Instagram blog hop featured blogger Carrie from CurlyCraftyMom
You may also visit Gosia, Kallee and Miranda to see their favorites. INSERT your features here.

Party Buttons

If you party with us, please place the 'Foodies and Crafties Soirée blog hop & link party' button on your blog:
Button Foodies And Crafties Soiree2
If you were featured by the host or co-host you are welcome to grab the 'Foodies and Crafties Soirée I was featured at' button:
Button Foodies And Crafties Soiree Featured
To place the button on your blog, just copy-paste the text from the highlighted areas below the buttons.
If you want to be immediately notified when the party goes live, be sure to subscribe by email:

Party co-hosting:

If you are interested in co-hosting the Foodies & Crafties Soirée in January 2014, please fill this form - it is short and it will help to plan everything.
Let's Party!
Don't forget to come back next week to check the featured projects from the party and meet the featured blogger - or perhaps it will be you?:)

Sverve Blog Hop:

  1. Link your Sverve account for today's blog hop.
  2. All participants must follow the host and co-hosts on the social media from the blog hop, so please follow us on Sverve. We will follow you back!
  3. Please follow at least 2 more bloggers and have fun meeting new friends!
  4. Each week there will be one featured blogger selected that all participants of the next party will be asked to follow on her/his social media.
If you are new to Sverve, check out this article to find out more and discover some tips on how to earn money with them.

Link party:

  1. Please show off your own creations, as much family & kids friendly as possible. You must link directly to the specific post. No link parties, No Etsy/shops, No giveaways.
  2. Visit at least 2 bloggers and let them know they are making awesome stuff, by leaving a comment on their post or by sharing their creation on your social media. When you share, don't forget to use a #foodiescraftiessoiree hashtag, so they know you have found them on this party.
  3. Each week the favorite posts from the party will be featured by the host and co-hosts on their blogs and shared on their social media. They will be also pinned to the Foodies and Crafties Soiree Pinterest board, so don't forget to Follow it!
FoodiesCraftiesSoiree Pinterest board
Please be aware that by sharing your posts at Foodies & Crafties Soirée, you are giving permission for featuring your projects to the host and co-hosts. Therefore your projects can be shared on social media and in round up posts with a link backs to your post. All credits go to you!

By joining and providing your email you are subscribing to updates about this link up. You may opt out at any time.

December 18, 2013

December Daily Update

I apologize for that small hiatus. The holidays have been keeping me plenty busy and so has PaperLark Studio. I hit a huge milestone in November - I made more money with PaperLark than I did at the daycare. For me, this accomplishment is HUGE! I'm inching closer and closer to my goal of doing it full time. It is safe to say I have some very high hopes for 2014!

I haven't had too much time for anything crafty for two reasons - I've been wrapping a gazillion presents and  have devoted all my free time to my December Daily album. I'm absolutely loving doing a December Daily album although I'll be the first to admit it can be intense. It's kind of like dedicating yourself to working out every day except a lot more fun. I try to make myself sit down for 10-15 minutes each night and scrap a page from the previous day. Doing so, I've been able to keep up without a hitch.

I thought I'd share some of my pages, but before I do, look at the adorable presents I made my kids at work! Well, the wrapping anyway...


I found these adorable free printable tags over at Creative Index. I grabbed some washi tape and paper bags and ta-da!

Now for your December Daily inspiration...


Happy Holidays!
Miranda


December 12, 2013

Foodies & Crafties Soiree #6

Welcome to Foodies & Crafties Soirée - Blog Hop & Link Party #6

each Thursday at 6PM EDT

#foodiescraftiessoiree

About the Party

Each Thursday, there will be a blog hop and a link party going live at 6PM EDT. Each week you will have an opportunity to link your different social media, for example:

  • week1: pinterest | week2: google+ | week3: facebook, etc.

Once all the social media are done, we will start over. There will be one featured blogger selected each week from the blog hop and a few projects/recipes from the link party. You will have a great chance to meet new friends, gain more exposure for your blog and more new followers!

The party is hosted for you by:

Gosia from Kiddie Foodies (host)

Gosia Kiddie FoodiesGosia loves sailing, travelling, gardening, sewing and all kinds of DIY, creative things. On her blog, she shares simple, healthy recipes for kids presented in a funny way to encourage them to discover veggies and fruits in a pleasant and tasteful way. Even picky eaters will love it! You can also find there different activities for kids, crafts and free printable coloring pages.

Follow her on: Pinterest | Google+ (Gosia) | Google+ (Kiddie Foodies) | Facebook | Twitter | Bloglovin | Instagram

Kallee from Creative Southern Home (co-host)

Kallee CreativeSouthernHome Kallee lives in East Tennessee with her husband and 4 great kids. She loves to read, play the piano, cook, craft and create. On her blog she enjoys sharing recipes she has tried, household tips, decorating, DIY, fun things to do with the kids, and the always fun reviews and giveaways.

Follow her on: Pinterest | Google+ | Facebook | Twitter | Bloglovin | Instagram

Miranda from Mr. and Mrs. Winslett (co-host)

Miranda  Mr. and Mrs. Winslett Miranda is a stationary designer who creates and sells her own line of stationary goods at PaperLark Studio. Outside of her design studio, Miranda is an avid crafter and scrapbooker who shares her latest projects at Mr. and Mrs. Winsletta. She's married to her high school sweetheart and lives with two of the most spoiled fur babies on earth.

Follow her on: Pinterest | Google+ | Facebook | Twitter | Bloglovin | Instagram

Sarah from Betty Cupcakes (co-host)

Sarah BettyCupcakesSarah is a Texas transplant blending her Southern homecooking with the flavors of Massachusetts and the Irish-Italian family she is married into. Read about her culinary adventures on her blog.

Follow her on: Pinterest | Google+ | Facebook | Twitter | Bloglovin

Features from last week's Foodies and Crafties Soirée #5

The featured Bloggers from last week's Twitter Blog Hop is Victoria from Creative Home Keeper. Congratulations Cindy!!! We did a random draw, so everyone had the same chances. Please show Victoria some love and follow her on Bloglovin!Foodies and Crafties Soiree Facebook blog hop featured blogger Victoria from Creative Home Keeper

You may also visit Gosia, Kallee and Sarah to see their favorites.

Party Buttons

If you party with us, please place the 'Foodies and Crafties Soirée blog hop & link party' button on your blog:Button Foodies And Crafties Soiree2

If you were featured by the host or co-host you are welcome to grab the 'Foodies and Crafties Soirée I was featured at' button:Button Foodies And Crafties Soiree Featured

To place the button on your blog, just copy-paste the text from the highlighted areas below the buttons.

If you want to be immediately notified when the party goes live, be sure to subscribe by email:

Party co-hosting:

If you are interested in co-hosting the Foodies & Crafties Soirée, please fill this form - it is short and it will help to plan everything.

Let's Party!

Don't forget to come back next week to check the featured projects from the party and meet the featured blogger - or perhaps it will be you?:)

Instagram Blog Hop:

  1. Link your Instagram account for today's blog hop.
  2. All participants must follow the host and co-hosts on the social media from the blog hop, so please follow us on Instagram. We will follow you back!
  3. Please follow at least 2 more bloggers and have fun meeting new friends!
  4. Each week there will be one featured blogger selected that all participants of the next party will be asked to follow on her/his social media.

[inlinkz_linkup id=350259]

Link party:

  1. Please show off your own creations, as much family & kids friendly as possible. You must link directly to the specific post. No link parties, No Etsy/shops, No giveaways.
  2. Visit at least 2 bloggers and let them know they are making awesome stuff, by leaving a comment on their post or by sharing their creation on your social media. When you share, don't forget to use a #foodiescraftiessoiree hashtag, so they know you have found them on this party.
  3. Each week the favorite posts from the party will be featured by the host and co-hosts on their blogs and shared on their social media. They will be also pinned to the Foodies and Crafties Soiree Pinterest board, so don't forget to Follow it!

FoodiesCraftiesSoiree Pinterest board

Please be aware that by sharing your posts at Foodies & Crafties Soirée, you are giving permission for featuring your projects to the host and co-hosts. Therefore your projects can be shared on social media and in round up posts with a link backs to your post. All credits go to you!

By joining and providing your email you are subscribing to updates about this link up. You may opt out at any time.

[inlinkz_linkup id=350260 mode=1 pageSize=300]

December 10, 2013

Burlap Christmas Stockings

The following is a guest post I wrote for Sugar Bee Crafts which was published on Dec. 7th! I hope you enjoy!

Sick of the red, felt stockings from the dollar store? Me too! That's why I made these super easy burlap Christmas stockings. 


Happy Holidays! My name is Miranda and I blog over at Mr. and Mrs. Winslett. There you can find me sharing projects, tutorials, recipes and my latest Project Life pages. Be sure to stop by and follow along!

Photo

Let's get started already!


What You Need:
Burlap
Muslin
Sewing Essentials (sewing machine, scissors, straight pins, etc.)
And maybe a hot glue gun...

In the interest of keeping it real, I'll admit my first attempt at making my own Christmas stocking was a complete, epic fail. 

I used a template I had pinned a while back and it just didn't work with the burlap. Why? I can't really say, but I felt the shape was just awkward. 

Being wary of using another printable template from the Internet, I used my old felt stocking as a template and it worked perfectly! 

Also, a quick word about how much burlap and muslin you might need - I purchased one yard of both burlap and muslin. If I had not messed up at my first attempt, I'd estimate that I could've gotten 4-5 stockings out of my burlap. As for the muslin, you'll need maybe 1 1/2 yards total because you use the muslin to make the cuff at the top of the stocking. 

Woosh!

Step One. Fold the burlap in half, pin the old stocking on the burlap and cut around the old stocking leaving about 1/2 inch of seam allowance. Repeat with muslin.

[[NOTE: I advise folding the burlap in half to save you from having to cut and pin twice. Plus, the piece you cut will be identical which is crucial for a decent looking stocking!]]


Step Two. You should have two stocking shapes of burlap and two stocking shapes of muslin. Pin your two pieces of burlap together and sew leaving the top of the stocking open. Do the same with the muslin.

[[NOTE: Because of the unraveling nature of burlap, be sure to give it a full 1/2 inch seam allowance. I learned this with my epic fail stocking.]]


Step Three. Take the open top of the stocking and fold it down about half of an inch down. Pin and sew. Do this with both the muslin and burlap.

[[NOTE: Fold the muslin to the outside and the burlap to the inside as shown.]]


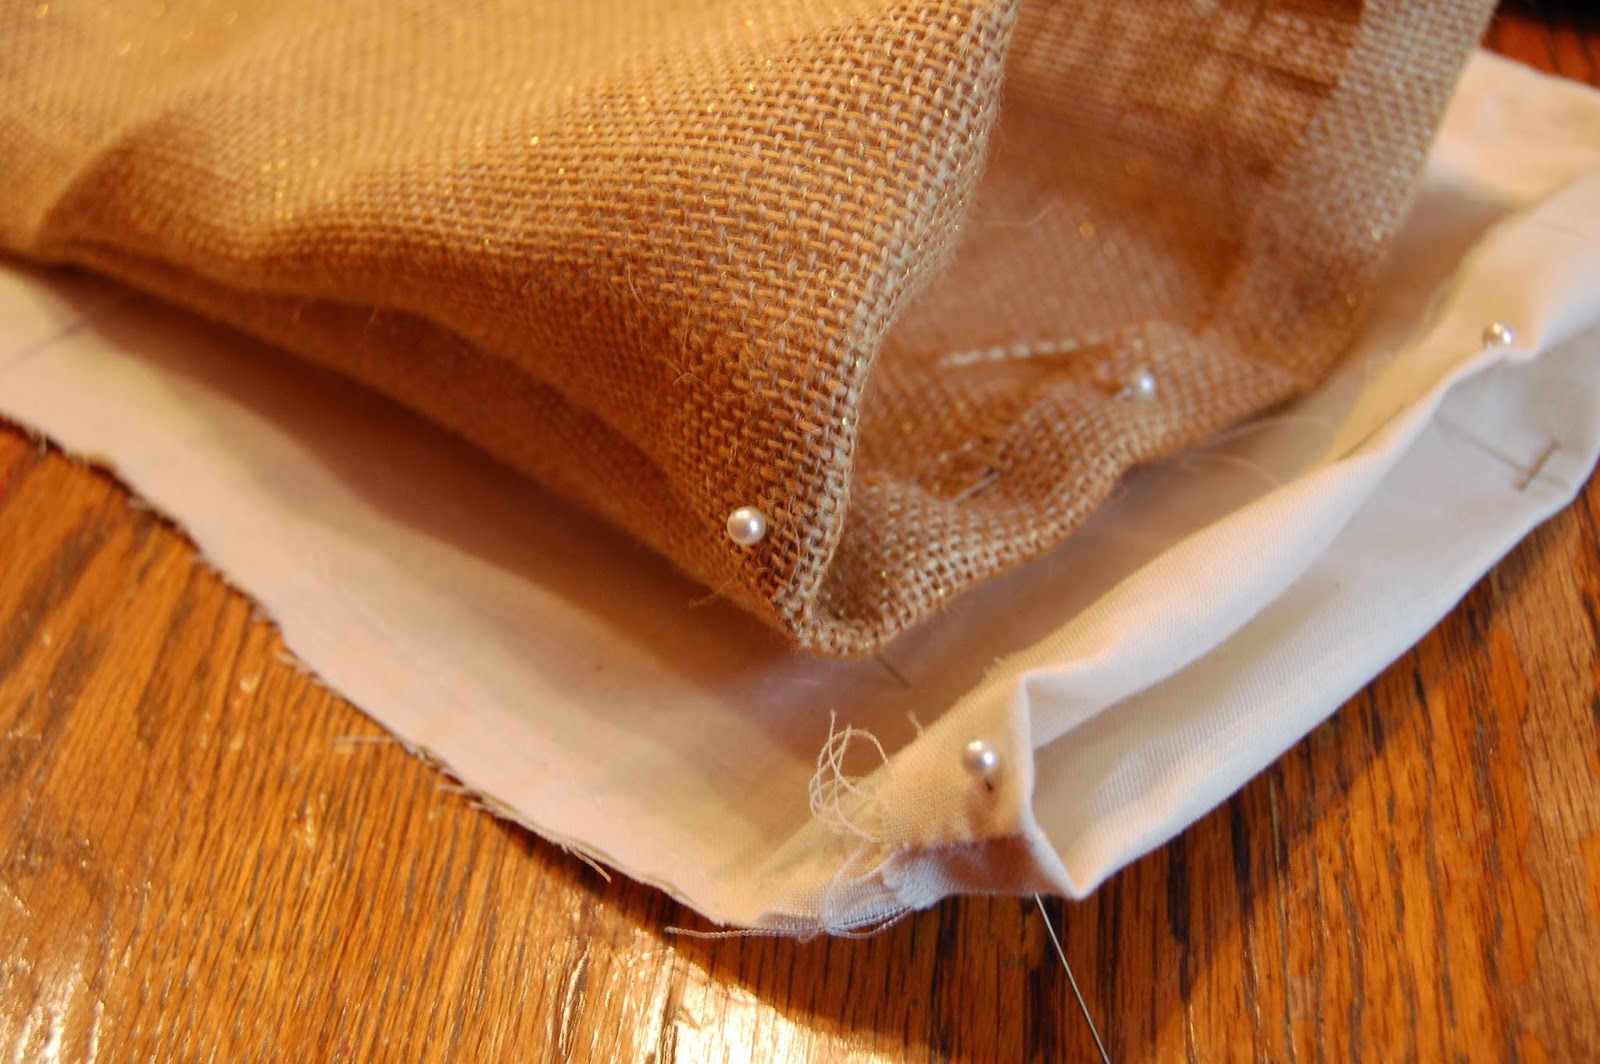
Step Four. Slip your muslin stocking down into your burlap stocking lining up the tops. Pin and sew.


Step Five. Cuff time!  Fold your muslin in half again and lay your stocking on top of the muslin. Leaving a good inch from the stocking's sides, cut a chunky rectangle from the muslin around the stocking. My chunky rectangle was about 6 inches tall. 


Step Six. Fold over the top widths of the rectangle about half an inch, pin and sew. Fold over one height end of your rectangle strip, pin and sew. 

[[NOTE: Make sure when you fold over the widths that you have a straight line.]] 


Step Seven. Here is where I cheat...plug up that hot glue gun and attach that cuff. After doing a couple of these stockings, I've found it easier to hot glue the cuff on instead of sewing it. Ha! To do it, glue the finished side of your cuff to the seam on the side of your burlap stocking. Continue gluing until you hit the seam on the other side of the stocking. Once you get there, let's talk about making the loop to hang your stocking.


Step Eight. Cut a strip of burlap about 4-5 inches long and 1-2 inches wide. Fold in half length-wise and sew. Fold that in half width-wise and glue together to make a loop. Glue your loop in between the stocking and the cuff on the backside seam of the stocking. If that got confusing, hopefully this picture will help.


Step Nine. More than likely, you will have some excess fabric from your cuff. It's definitely better to have excess fabric than not enough. To finish your cuff, cut off the excess fabric about 1-1 1/2 inches from the stocking. Fold it under and hot glue against the seam to close the cuff. 

There you have it! One great thing about burlap is that it's pretty pliable. Therefore, you just have to play around with the burlap in your fingers to get it to hang the way you want it. 


Now then, hang your stocking up on the mantel! I've got two down and two to go. 


If you enjoyed this tutorial, then be sure to follow me and my blog via the social media below so you don't miss anything. 

You didn't hear it from me, but there just might be a tutorial next week on a no-sew burlap tree skirt that would compliment these stocking rather nicely!

See you then!
Miranda from Mr. and Mrs. Winslett


Related Posts Plugin for WordPress, Blogger...
Powered by Blogger.
Designed By Boutique-Website-Design