

January 26, 2015

January 20, 2015
Three Steps to Successfully Tackling a Branding Makeover

When I started PaperLark Studio back in 2012, I offered mainly baby shower and kids' birthday party invitations. Up until recently, my logo reflected this with a child-like, fun font with my yellow bird perched atop the letters. Here's an example:
 |
| Logo circa late 2013 - early 2014 |
Last year, I began introducing more products that strayed away from my original child-centered focus. I expanded beyond only paper products to include fabric goods. My business was growing exactly like I had wanted it to and I quickly realized I was outgrowing my logo {and subsequent branding} as well.
One of the many goals I had this year was introduce a more "grown up" logo and brand to better fit my new customer base and style. I'm still in the {slow} process of converting everything over, but I'd like to think I have a pretty solid start going now. For those of you who are developing a logo and brand or for those who are in the same boat as I was, here's a run down of how I tackled my major brand makeover!
IDENTIFY ELEMENTS CENTRAL TO YOUR BRAND. Because I have some loyal customers and social media followers, I didn't want to go a totally new direction to the point where they wouldn't recognize the logo or business. Strong brands have elements that immediately pop into your head when you hear them - like logo shape, color, wording, etc.
For a prime example, look at this graphic of the evolution of the Coca-Cola logo over the span of their operation. The key elements they pulled out and have consistently used are the fancy font and trademark red. You want to do the same with your new logo and branding.
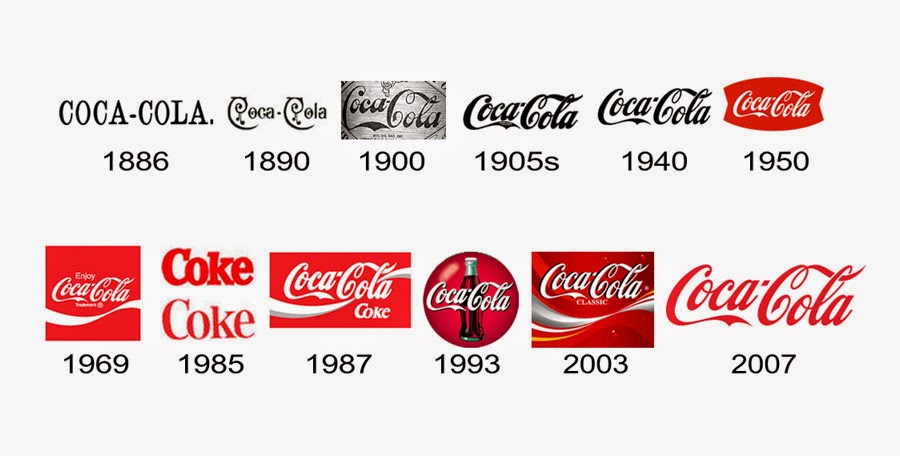 |
| Courtesy of Logo-Kid.com |
CONCENTRATE ON YOUR BRAND AND CREATE LOGOS. As my business has grown, so have my core business values and style. Because I've done a pretty significant shift toward hand lettered designs, I decided a hand lettered font would be good fit to convey what my business was all about. I also hunting for a logo design that was a little more grown up, but still fun. Without further adieu, here is PaperLark Studio's new logo:

I'm pretty much in love with it and I should be as much as I stressed over it. Ha! It's grown up, but still a little whimsical while paying homage to element of the old.
CREATE A BRAND BOARD. I'm still in the process of creating my brand board, but I have pretty solid basics here I thought I'd share.

Why create a brand board? I don't know about you, but my creative brain can sometimes run array when I think I have a stroke of genius. Brand boards help creative brains like mine focus on a brand's core values and personality at one glance. If my stroke of genius doesn't fit into the board, it goes to the recycle bin.
However, do not confuse your brand board with a style guide. The difference? A style guide is instructions on how to use your brand elements within your business. Brand boards just display all the elements of your brand.
If you'd like to learn further about how to create a brand board, I recommend this excellent post by Elembee which you can find here.
What tips do you have for tackling a brand overhaul?
January 19, 2015
Lessons I've Learned From Owning My Own Business
In July, PaperLark Studio will be celebrating its three year anniversary. While I was putting my plans down on paper for this year, I started listing some of the lessons I've learned over the past few years in running my own business.
Most of these lessons were learned the hard way or through lots of trial and error. If you have your own business, I'm sure you'll be able to relate to many of them and perhaps even get a chuckle out of some. If you are planning to start your own business, I hope these will help you start your journey on smoother waters. After all, knowledge is power, right?

IT TAKES A VILLAGE. The title of this post is misleading. I may be the one who "owns" my business according to my federal tax return and my business license, but PaperLark Studio is far from a one-woman show. From giving input on new designs to helping man the booth at craft shows, my family are the silent partners in the business and keep me grounded. Plus, they're pretty brutally honest when I have a sucky idea. Ha! Without my "village," PaperLark Studio would be ten steps behind what it is today.
BRANDING IS EVERYTHING. Learn it. Breathe it. Live it. I have learned so much about what branding is and why it is important. For me, branding has been one of the most challenging {and intimidating} things to learn and incorporate into my business. Over the years, my branding has evolved significantly and I'm just now really starting to feel comfortable with it. Once I figured out my core values and my market niche, my brand fell into place. I still devour branding tips when I run across them.
DON'T COMPARE YOUR BEGINNING TO SOMEONE ELSE'S MIDDLE. There is a difference between comparing and admiring. Don't get the two confused! It's easy to beat yourself up when you compare your starter shop to someone who has a couple years in the game under their belt. Just remember: They started somewhere too just like you.
PASSION ISN'T ENOUGH. Sounds harsh, but it's the truth. Unfortunately, there is much more yucky, no-fun tasks to running a successful business than just creating and making all day. {If only, right?} While passion certainly keeps you going on the rough days, you'll spend most of your day doing tedious tasks like tracking dollars, strategizing your next marketing move or filling orders. After all, you can't just wait around and expect it all to fall into place. Your dreams won't work unless you do!
COMPETITION IS A LIE. When your products/services are original and one-of-a-kind, you'll have no competition. Sure! There are thousands of talented graphic designers and hand letterers out there, but my aesthetic and style is mine. If you look around in any industry, you'll notice that the industry leaders are not the industry followers. The moral of this lesson? Be original always.
ALWAYS CARRY BUSINESS CARDS. Since most of my business is conducted on the computer, I sometimes forget about the face-to-face potential aspect of business. I'm a little embarrassed to admit it took me several times of being caught without a business card to learn this lesson. I'm sure I've missed some prime business opportunities because of it. One of my most loyal customers I met in town. Thankfully, I was able to hand her a business card on the spot and she made her first purchase the next day.
Are you a business owner or blogger? What lessons have you learned through the years?
Most of these lessons were learned the hard way or through lots of trial and error. If you have your own business, I'm sure you'll be able to relate to many of them and perhaps even get a chuckle out of some. If you are planning to start your own business, I hope these will help you start your journey on smoother waters. After all, knowledge is power, right?
BRANDING IS EVERYTHING. Learn it. Breathe it. Live it. I have learned so much about what branding is and why it is important. For me, branding has been one of the most challenging {and intimidating} things to learn and incorporate into my business. Over the years, my branding has evolved significantly and I'm just now really starting to feel comfortable with it. Once I figured out my core values and my market niche, my brand fell into place. I still devour branding tips when I run across them.
DON'T COMPARE YOUR BEGINNING TO SOMEONE ELSE'S MIDDLE. There is a difference between comparing and admiring. Don't get the two confused! It's easy to beat yourself up when you compare your starter shop to someone who has a couple years in the game under their belt. Just remember: They started somewhere too just like you.
PASSION ISN'T ENOUGH. Sounds harsh, but it's the truth. Unfortunately, there is much more yucky, no-fun tasks to running a successful business than just creating and making all day. {If only, right?} While passion certainly keeps you going on the rough days, you'll spend most of your day doing tedious tasks like tracking dollars, strategizing your next marketing move or filling orders. After all, you can't just wait around and expect it all to fall into place. Your dreams won't work unless you do!
COMPETITION IS A LIE. When your products/services are original and one-of-a-kind, you'll have no competition. Sure! There are thousands of talented graphic designers and hand letterers out there, but my aesthetic and style is mine. If you look around in any industry, you'll notice that the industry leaders are not the industry followers. The moral of this lesson? Be original always.
ALWAYS CARRY BUSINESS CARDS. Since most of my business is conducted on the computer, I sometimes forget about the face-to-face potential aspect of business. I'm a little embarrassed to admit it took me several times of being caught without a business card to learn this lesson. I'm sure I've missed some prime business opportunities because of it. One of my most loyal customers I met in town. Thankfully, I was able to hand her a business card on the spot and she made her first purchase the next day.
Are you a business owner or blogger? What lessons have you learned through the years?
January 16, 2015
My Word for 2015: Intention

Every January, I like to take some time and pick a word to focus on for the year. Words are powerful and can help us refocus when things get a little hairy in life.
Last year, I focused on the word JOURNEY. Why? Because I knew that year would be a learning experience as I dove head first into pursuing PaperLark Studio full time and navigating through changes in my personal life. Remembering my word helped me maintain focus and kept me from getting discouraged.
After some time of reflection, my word for 2015 is INTENTION. Many times during my "journey" last year with my business, I often made decisions without a clear intent. This lead to frustration, the feeling of flying by the seat of my pants (which I hate) and probably some loss of money. A lot of it was simply because I didn't know what I was always doing. That's okay, because that is how you learn! This year, I am learning from those mistakes by acting with intention.
For me, intention will include a lot of planning and executing. It is my hope that by focusing on intention, I will gain more purpose instead of wasting time. With a little one on the way, my time needs to be spent wisely!
What is your word for 2015?
Miranda
I got the idea from Ali Edwards and her One Little Word project. (Read more about Ali and the project here)
January 8, 2015
The Differences Between Typography + Calligraphy + Hand Lettering

Here's a quick rundown of the differences and how you can spot them.
TYPOGRAPHY
Typography is the art of setting type using mainly pre-made fonts. Typography goes hand-in-hand with graphic design. When I started PaperLark Studio back in the day, this was the only style I used to create prints and cards. I still use it and a prime example would be my SouthMouth cards which you can find in my shop here.

CALLIGRAPHY
Calligraphy is writing the word. Much of hand lettering work looks like calligraphy, but each has an entirely different style of application and execution. Calligraphy is the art of perfecting a few different style of script. You use these styles over and over, developing a muscle memory for them. Becoming a proficient calligrapher takes years upon years of practice. {Something I wish I had the patience for, but alas I do not.}
An example of calligraphy is this addressed envelope by Mint Tea Calligraphy.

HAND LETTERING
Hand lettering is drawing the word and is most commonly confused with calligraphy. Lettering incorporates all kinds of styles and offers a little more freedom than the perfection of calligraphy or being restricted to a pre-made font like typography. This is probably why it has become my favorite medium. It allows for experimentation and there's no strict rules. {There are some basic guideline you should try to stick to, but that's for another post.}
Here's an example of a hand lettered print you can find in my shop here. I bet you'd never guess that I live in Georgia, huh? Ha!

WHY HAND LETTERING IS MY FAVORITE.
Besides the freedom and flexibility I talked about above, I love how organic hand lettering feels. Hand lettering is unique to each letterer. You just can't get that warm feel with a pre-made typeface.
There you have it, folks! Time for a pop quiz. Just kidding! If you're interested in exploring the world of hand lettering, you should stick around because I have a few "How-To" posts in the works.
Be sure you don't miss a thing and follow along:


Until next time!
Miranda
January 7, 2015
Baby Winslett Pregnancy Update: Week 11

On New Year's Eve, we officially announced the pending arrival of our newest coworker. I've already started a pregnancy/baby scrapbook to record this special and exciting journey and thought I'd share part of it with you.
Baby Stats: 11 weeks and 4 days. Strong heart beat of 175 bpm at last ultrasound. About the size of a lime.
Eating: Cheez-Its and pickles. These seem to be my cravings this week. In other words, anything salty!
Drinking: Water and V8 Vegetable Juice. I'm always thirsty these days.
Avoiding: Caffeine. I've had the worst heartburn ever and quickly learned these only made it worse. Last weekend, we bought a huge bottle of TUMS from BJ's and they've been my best friend ever since. Eggs. Something about eggs absolutely repulses me right now which is funny because I love eggs. My mother made an breakfast egg casserole on Christmas morning and I almost died from the smell. I had to sit outside on the back porch for a bit while it cooked.
Wearing: Yoga pants, loose-fitting shirts and some maternity jeans. I'm savoring the dwindling days where I still fit into some of my shirts. Seriously though, why don't they make all pants like maternity jeans? They're so comfortable!
Feeling: Chunky. I'm in that awkward stage where I don't look pregnant - just like I've had one too many cheeseburgers. Ha! It's only bloating and not cute in the least. Other than that, I've been feeling better energy and feeling yucky-wise. I still have bad days, but more good days than bad.
Buying: Maternity/nursing bras and maternity tank tops for this spring and summer. I bought a Snoogle pregnancy pillow last week that should be arriving today and it's a little ridiculous how excited I am about it.
Sleeping: Why am I so excited about this pillow? Because my sleeping has been unpredictable, frustrating and sometimes downright awful the last two weeks. The first problem is that pesky heartburn. Of course, when I lay down it gets worse. The pillow is suppose to help ease this since it'll put me in a more upright position. The second problem is I literally can't fall asleep. It isn't because I'm uncomfortable or my mind is turning. I simply cannot fall asleep. Once I am asleep, I'm good to go until I have to go to the bathroom. After I get up for that, I can't fall asleep again. It's a vicious cycle. From what I've read, it's my hormones and should subside by the 2nd trimester.
Loving: Tossing baby names around with the husband. We've narrowed it down to a few that we love, but our lips are sealed for now. I'm also loving deciding what colors and theme we want for the nursery. My mom will be making the baby's bedding so it's been fun looking at different fabrics and patterns with her.
Getting Use To: Having the pee all the time and growing HUGE boobs. From what I hear, the peeing thing only gets worse. Oh joy. Not looking forward to that. It's just annoying especially when I'm trying to work and focus. But, I'm not going to lie. The boobs have been pretty awesome thus far. I'm digging them even more now that they're not as sore. I've never really had big ta-tas so I'm enjoying the upgrade. There's got to be some perks, right? Hehe.
About Daddy: It's no surprise that R.J. is thrilled. I've loved seeing him studiously reading his daddy-to-be book and how his eyes lit up during the first ultrasound. It was even his idea to spend his Friday off price comparing baby items together last week. I wish I'd taken a video of his mini-freak out session in the middle of BJ's surrounded by cases of wipes and diapers as the sticker-shock sank in. When he ordered his books for this upcoming semester, he couldn't resist buying a Dr. Seuss book to read to baby while still in utero. I think it's safe to say this munchkin already has daddy wrapped around his/her finger.
Fellow Mommies: Any tips for easing up this heartburn?
December 5, 2014
Etsy Find Friday: Apple White Handmade

In this day and age, I think many view sewing as their grandmother's hobby. So, when I stumble upon a sewer who brings the skill into modern times, I get downright giddy. Dana of Apple White Handmade nails this with her use of modern designs in fabric and style.

Her mother taught her how to sew when she was five years old. From there, her dream for owning her own creative business grew. When she faced a "now or never" moment, she jumped in.
All Apple White Handmade items are designed, cut and sewn by Dana who is inspired by people using their natural talents.

I think her tooth fairy pillows are my favorite item. These pillows were inspired from a drawing her daughter drew a while back. I love their design and the modern fabrics she uses to create them. Even with the modern fabrics, there's just something about them that screams vintage as well.
What's your favorite Apple White Handmade item?
Miranda
December 4, 2014
DIY Christmas Stocking Bow Tutorial

Originally, I had thought about getting small wooden letters, painting them and then writing the names on them. However, my Christmas budget is pretty much spent so I needed to come up with something from supplies I had on hand. Here's what I came up with:

The ribbon is actually left over from a partially used roll from our wedding. I'd been trying to use it up by using it to wrap presents. It's so wide and the finish was perfect for me to write the names on. I wouldn't advise using satin ribbon because your ink will bleed.
What You'll Need:
2-3" wide ribbon {mine was 2.5"}
Scissors
Sharpie
Safety Pins
Step One. Tie a bow with your ribbon, making it your preferred size. Before cutting your ribbon, be sure your two tails are long enough to write the name on.
Step Two. Cut a small V on the tail ends. Take your sharpie and write the name on the ribbon. If you are lefty like me, proceed with caution so you don't smear the ink like I did on my first ribbon!
Step Three. Stick your safety pin through the back of the knot in the middle of your bow. Lastly, simply pin your ribbon onto your stocking.

Now then, you've just got to repeat that for how many every bows you need. The only tricky part was trying to get them to look close to the same size. After playing around a little, I think I did pretty well. In all, I made all five of these in about 30 minutes.
Happy Holidays!
Miranda
Happy Holidays!
Miranda
November 27, 2014
Free Printable Holiday Gift Tags //// BLACK Friday
Happy Thanksgiving!
I am so grateful for each and every one of you! Thank you for hanging out in my little piece of the blogosphere. Thank you for supporting PaperLark Studio. Thank you for allowing me through that support to be able to live my dream every day and provide for my family!
To show just a smidgen of my gratitude, I thought I'd share three gift tags with a few of my holiday designs on them for you to use this holiday season. I printed my tags on kraft paper, but you can certainly use whatever card stock you prefer!


Once you receive your wrapped order, just print one of these tags out to finish off your gift. Of course, I'd love to see any and all pictures, so use the hashtag #paperlarkstudio. I just might share it!
Now, go take a much deserved nap. I'll take care of the gift wrapping!
Miranda
*Free gift wrapping is not included on invitations or photo greeting cards.
I am so grateful for each and every one of you! Thank you for hanging out in my little piece of the blogosphere. Thank you for supporting PaperLark Studio. Thank you for allowing me through that support to be able to live my dream every day and provide for my family!
To show just a smidgen of my gratitude, I thought I'd share three gift tags with a few of my holiday designs on them for you to use this holiday season. I printed my tags on kraft paper, but you can certainly use whatever card stock you prefer!
Starting today, for Black Friday, Small Business Saturday and Cyber Monday, I am offering free gift wrapping* and free shipping on all orders. {Say what?!} Just use the coupon code XMAS14 at checkout!
Now, go take a much deserved nap. I'll take care of the gift wrapping!
Miranda
*Free gift wrapping is not included on invitations or photo greeting cards.
November 25, 2014
Tuesday's Top Three
With Black Friday almost upon us, I thought I'd highlight my top three favorite PaperLark products. I'll share why I picked them and give you a little insight as to how they were made. {Be sure to check out my Black Friday-Cyber Monday coupon code at the bottom!}

1 /// These Are a Few of My Favorite Things Pack of Five Notecards, $8+ - Growing up, this was one of my favorite Christmas songs. I started working on my Holiday 2014 line back in September. Of course, I was listening to Christmas music when this song came on and I started doodling. Ta-da! This is what resulted. It's one of my favorites simply because I impressed myself with it. It was my first attempt at a free-handed, illustrated card and I love how it came out.
2 /// Georgia on My Mind Tea Towel, $14 - This design started out as an art print that I only sold at craft shows. I'm loving the state pride trend that is so popular at the moment and this was my answer to it. Turns out most of my customers who stopped in at my booth loved it too! When I introduced my own line of tea towels earlier this year, I knew this design had to be included. It has spurred custom requests for other state tea towels like Florida, Alabama and Tennessee. Hopefully, in 2015, I'll be offering even more states! But until then, I'll keep beaming with my home state pride.
3 /// Well Butter My Biscuit Pack of Five Notecards, $8 - Of all those sassy Southern sayings in my South Mouth Collection, this one is my favorite. It makes me giggle every time I read it. It's also the card that gets the most reaction at craft shows. People always break out a laugh or a smile when they see it and always comment something along the lines of "my grandmother says that all the time." There's just something totally unique and just plain amusing about Southern sayings and I love being able to connect with others' experiences through a card. While I've sold my fair share of these with the state of Georgia on it, the great state of Texas is the second most requested. {But, I can put any state you'd prefer on there for a custom touch, of course.}
And yes! I will be having a Black Friday - Cyber Monday sale in the shop. Use the code XMAS14 to get FREE SHIPPING + FREE GIFT WRAPPING* on all purchases.
Of course, feel free to use that coupon code to purchase any of my top three favorites or any items in my shop. In advance, thank you for buying handmade and supporting small business! You're awesome!
Miranda
*Free gift wrapping offer excludes printed invitations, holiday photo greeting cards, and/or announcements.
November 21, 2014
Etsy Find Friday: The Best of Thanksgiving
With Thanksgiving less than a week away, I thought it would be fun to switch up Etsy Friday a little. Instead of highlighting one shop, I have a collection of some stellar Thanksgiving-related goodness for you.


1 /// Give Thanks Sculpted Clay Pumpkins by Skyeart, $26 - Amy, the creator behind Skyeart, sculpted these adorable little pumpkins from polymer clay and stamped the text by hand from her home studio in Colorado. Wouldn't these be adorable to add to your Thanksgiving decor?!
2 /// Iced Pumpkin Cold Process Soap by Lippincott Soap Company, $6.50 - You have to read the description of how this sucker smells on its listing. Holy cow! I can almost smell it bringing Thanksgiving to my bathroom. Each soap is handmade and created in a kitchen in Pennsylvania. Every bar of soap is made by either cold or hot process using natural oils and butters. {Angela's Christmas soaps and goodies look equally divine too!}
3 /// Thanksgiving Gourmet Dog Treats by Nutty Mutt Bakery, $8 - Don't forget an extra special treat for your furry friends. The turkey legs are made from their wheat-free chicken recipe, dipped in a peanut butter coating and sprinkled with chopped peanuts. The pumpkin pie treat is made from a pumpkin cookie recipe and decorated with a yogurt coating. Every treat from Nutty Mutt Bakery is baked fresh from scratch in Greenfield, Indiana.


4 /// Thanksgiving Cards Box of 8 by August & Oak, $20 - Isn't this little guy cute? Of all the Thanksgiving cards I've seen this season {and I've seen a lot being in the stationery industry}, this illustrated card has been my favorite. My mailbox would be so happy to receive this card for Thanksgiving.
5 /// Gather Dish Towel by Nesta Home, $16.50 - Since I sold out of my limited edition Thanksgiving tea towels a couple of weeks ago, I thought I'd add in a towel that I really liked. I love this towel because its maker, Tandie, hand dyed it. I love extra special handmade touches like that.
6 /// Pumpkin Garland by Wish Daisy, $29 - This would look so cute on my mantel! To create her pumpkin garland, Stacey used dried and dyed Putka pods. She also has some other adorable Thanksgiving/Fall items you should check out.
What handmade goods are on your Thanksgiving want list?
Best,
Miranda
November 20, 2014
DIY Vintage Window Christmas Advent Calendar

I had an old window sitting down in the garage that I had rescued a while ago from a barn. I've been holding onto it, waiting for the right project to come along. Alas! I thought it would make the perfect addition to my advent calendar.
I pulled the window out of the garage, wiped it down really well and got to work. This project didn't actually cost me anything because I had all the supplies already {big yay for being a craft supply horder!}. However, if you can get your hands on an old window, I'm sure this project wouldn't take much to make.

What I used:
Old window
Twine
Hot glue gun and glue sticks
Brown paper bags
Ribbon
Scissors
Stapler
Paint Pen
Treats for the bags
Step One. Create your bags. I used large lunch paper bags. Because the large bags were clearly too big, I cut them into fourths and just stapled the edges to make my smaller bags. {Of course, you could buy small paper bags and skip this step}
Step Two. Once I had 24 smaller bags, I took a paint pen and drew my letters on each bag. Let these dry really good and then stick your treats in, folding over the top.
Step Three. Prepare your window. Measure out your twine and then glue it on the back of the window frame. Do this with each twine piece you'll need. {On my window, I used five twine lines and fit five bags on each - expect for the last one which only had four bags.} Let the glue harden.

Step Four. Tie your pretty ribbon in a bow onto the twine and then staple the bag to the ribbon. Do this for each of the 24 bags. I staggered the lengths of my ribbon so the bags would hang at different lengths just to give it some character.

Once you have all 24 bags tied and stapled, you can embellish your window frame any way you'd like. My window had one pane of glass left in it, so I took a paint pen and did a little hand lettering to jazz it up. I also added some garland around the outside.

Oh! And a quick tip if you need to purchase some materials for this project. Be sure to check out Raise.com! This handy site lets users purchase gift cards for less than their value which will help you save some extra cash. They do have gift cards to Joann's and Michaels {and more}. I'm trying to get into the habit of checking this website to see what gift cards they have if I'm planning a big project. I've seen gift cards up to 23% off. Every little bit helps!
https://www.raise.com/buy-
https://www.raise.com/sell-
Happy creating!
Miranda
November 18, 2014
Tuesday's Top Three
Take a deep breath. Now, let it out with a huge groan. Yup! That's right. It's the time of year where I go back revisit and rewrite my business plan. {Insert a unanimous ewww! here}


I dread doing it every year. Though I grumble and groan about it, there's a reason why I subject myself to the torture year after year. Frankly put - my business couldn't succeed {and more importantly grow} without it!
I wrote my first business plan about six months after opening my shop. Heck! When I opened my shop in July 2012, I didn't even know what a business plan was. It was only by chance I stumbled upon Grow Your Handmade Business by Kari Chapin {affiliate link} did I read about business plans and learn why they were so important. I purchased this e-book for my Kindle and make a point to skim over it every year before revisiting my business plan. It's that good!
My business plan helps me stay focused. While I may need it one day to show a bank or an investor, I really use it right now as the blueprint for my business. It tells me what I've done, what I'm doing, where I want to go and how I'll get there.
I've run across a handful of excellent posts/articles on tips for writing a business plan through the the last couple of years. I hope they'll help you as much as they've helped me in constructing my business plan!
1 /// How to Write a Freelance Business Plan - Start here! Regina from ByRegina.com offers a comprehensive how-to complete with an instructional walk-you-through-it video and free supplementary printables. Whether you are a blogger, designer, creative, etc., Regina gives you a great starting platform to begin creating your business plan.
2 /// Design a Business Plan for Your Creative Business - Amanda speaks directly to creatives in this post and offers some extra creative-centered points to add into your business plan. In my own business plan for PaperLark Studio, I merged Regina's suggested plan layout with Amanda's to better suit my needs.
3 /// How to Create a Marketing Calendar for Your Business - In the last year, my business has grown significantly. With the growth, I quickly learned that in order to keep up in 2015, I'd need to incorporate a marketing calendar into my business plan. In 2014, I {without a doubt} flew by the seat of my pants when it came to the marketing aspect of my business and probably lost some money because of it. Not in 2015! And that starts here.
If you'd like to see more awesome posts on blogging and business, be sure to check out my boards, The Etsy Shop and The Blogging World, on Pinterest.
Now it's your turn! Which blogs and/or posts about construction your business plan have been helpful for you?
November 14, 2014
Etsy Find Friday: Jane Foster
I literally just found this shop. Seriously! I stumbled across it Wednesday through an email from Etsy and instantly fell in love with it.
Jane Foster creates soft toys, prints, pillows and pouches from her own Scandinavian influenced designs. She designs, screen prints and sews all from her studio in Devon, UK. Her love for Scandinavian design from the 50s and 60s shines through in all her products - my current favorite definitely being the Retro Santa.


 |
| Photo by Jane Foster |
She also has a Mr. and Mrs. Claus set! Isn't this too stinkin' cute?! She created these two to poke out of her daughter's Christmas stocking.
Not only would they make precious gifts for a kid, I think they'd be adorable to add to your Christmas decor. I know exactly where I'd put them in our house - on the bookshelf in our living room which is right beside our tree.
Of course, she has some other non-Christmas cuties like these little foxes.
She was a featured Etsy seller a few years back. If you'd like to read more about the story behind her handmade shop, you can read her interview here. Also, be sure to check out her website! I'll be following her in the future when I need a little inspiration from a handmade business. It is pay day too. Perhaps, one of those little retro Santas will be finding a new home on my bookshelf!
Miranda
November 13, 2014
Freebie: Baby It's Cold Outside Art Print

This free printable is definitely inspired by the cold weather we are currently having. Tonight it is suppose to dip into the 20s! In Georgia, that never happens until January and it isn't even Thanksgiving yet! I will be spending my evening {and the next few from the looks of it} snuggled up close to a fire with a warm drink in my favorite mug.
As winter creeps closer and closer, I hope this print will add some warmth to your home. I printed mine out and put it next to my Keurig. The printable is formatted as an 8x10, but you can print it as a 5x7 - just be sure to change your print settings!

I'd love to see a picture of how you used your free printable! Use the hashtag #paperlarkstudio or tag me in your post on any of the social media below.


Also, if you love anything "Baby, It's Cold Outside," be sure to check out my ever popular baby shower invitation with this theme in my shop.
Enjoy and stay warm!
Miranda
Subscribe to:
Posts (Atom)
